Beautiful and capricious: how to propagate an orchid at home?
 A beautiful indoor flower can make even the simplest apartment extraordinary. If in nature, orchids can live in all kinds of places, hanging from rocks and trees, covering the ground, then at home, being torn from their native climate, they become quite moody.
It is not so easy to satisfy its tropical predilections, therefore, flower propagation, which is simple in nature, can be accompanied by some difficulties.
Next, we will tell you what are the methods of reproduction, how to do this procedure correctly. As well as how to care for a young sprout.
Is it possible to propagate?
Propagation of orchids at home is feasible. The most popular methods are kids and roots. You can propagate the orchid and seed method. If vegetative breeding may well be practiced even by a beginner, then seed breeding requires tremendous experience and patience. Basically, this method is interesting to breeders.
Orchid varieties have their own characteristics not only in appearance, but also in terms of reproduction. In addition to orchid cultivation by children and roots, there are a number of other methods (cuttings, layering, peduncles, etc.).
Reference. It is necessary to carefully study the needs and specifics of the variety before proceeding with the process to make the right choice of propagation method.To learn about whether it is possible to propagate the Nobile dendrobium and in what ways, we offer from this article.
When is contraindicated?
- In case the plant is sick.
- In periods not in accordance with the recommended.
The most The best time to reproduce, like many other plant species, is spring. At the beginning of the spring season, when the orchid is already on the verge of leaving the dormant period, it has accumulated enough strength to begin reproduction without compromising its life potential.
Natural and forced
If propagation by cut off plant parts belongs to the compulsory category, then breeding by seeds and shoots is considered a natural form of propagation, since the florist, using natural trends, only creates favorable conditions and contributing factors for the reproduction to take place.
What remedies can help?
 Orchid cultivation using cytokinin paste greatly facilitates the procedure and improves the effectiveness of the project. This is a hormonal type preparation that contains substances that stimulate growth - cytokinins.
In addition to cytokinin paste, Keikigrow Plus products are on sale, essentially the same, but significantly more expensive.
You can buy, but You can do it yourself:
- Mix 10 mg of kinetin with 1 ml of water and 1 g of lanolin.
- Bring to uniformity.
If everything is exactly done, then in the end a white ointment will be obtained.
On a note. The product is stored in the refrigerator. It is used if only one shoot grows during the breeding process.Orchid is treated with paste and placed in a greenhouse., maintaining the temperature regime of +28 for one to five days, after which they do another treatment.
What is the work with hormonal ointment?
- Stimulation of the plant to the formation of a new kidney:
- With a sterile needle from the syringe, make a scratch on the stem.
- Apply a drop of paste, covering the scratch.
- In a couple of weeks, the baby will begin to emerge.
- Stimulation of the kidney to awakening:
- With a sterile needle, scratch the scales of the kidney, apply paste.
- A week and a half is enough to wake up.
Nuances
 The optimal stimulation time is the time of orchid growth or the period of recovery from dormancy, before awakening.
- You can not stimulate more than three buds on one orchid.
- If you need to create a point of origin of the peduncle, then the paste is applied minimally, and if you need children, then more.
- Too much paste to stimulate the appearance of the baby will lead to the release of several shoots from one point, which will make them weak.
- When producing artificial stimulation, you need to take care of recharge, lighting and a warm climate.
 The optimal stimulation time is the time of orchid growth or the period of recovery from dormancy, before awakening.
Description of the methods
There are such ways:
- Vegetative or asexual way, called methods where parts of the mother are used. Cuttings, layering, babies, shoots, etc.Reference. The parameters of the mother plant are precisely passed on to new generations.
- Sexual or generative, involves working with seed material. It can give both a repetition of external properties, and create some deviations and changes in external features.
- Separately, there is a method of cloning.
- Orchid breeding, where the most sophisticated technologies are used.
Flowers growing on the street and at home
To reproduce orchids at home, special temperature conditions are required, preparation of the plant, there are also its own nuances of care, which creates the most favorable conditions for breeding.
Among the many ways for certain varieties there are both the most suitable, and vice versa, completely ineffective. Orchids living on the open ground are propagated by division and children.
Training
 Since different varieties have their own favorable methods of reproduction, then we will consider the preparation of an orchid of the popular phalaenopsis variety, which is easy to propagate even for a beginner grower.
The variety propagates vegetatively, the growth point in phalaenopsis in the singular, but with the help of some manipulations, you can fix the defect.
The most effective here is to jail the children formed on the peduncle. Since this variety at home without additional stimulation often does not give children, the plant must be prepared in the following way, provoking their formation.
Methods
- At a humidity of 70% or more, create a temperature difference. During the day, 28-30 degrees, and at night 18-20 degrees. Daylight hours should last exactly half a day.
- Sunbathing. For this, the plant is placed under the spring rays of the sun for an hour a day. If purple color appears on the leaves, it does not matter, but if the flower has become black and purple, then urgently stop sunbathing.
- Stop watering for two weeks or so, by moving the flower to a place where the direct rays of the sun do not pass. Watering resumes, three days after the roots became silver-gray.On a note. The flower fixes that it is close to death and the natural mechanism of activating the ability to reproduce is triggered.
- Fertilizing with nitrogen. This is a controversial method, it has many side effects, you can damage the orchid or get a baby with flowering difficulties.
How to do it right: step by step photo
Seeds
Orchids have a very small seed size, and there is practically no nutritional shell. They look like specks of dust. Under natural conditions, the so-called root sponge or mycorrhiza mycorrhiza promotes the development of a seed germ. Thus, the seed is provided with the necessary nutrition for life and development. So, in artificial conditions, it is necessary to create alternative recharge.
Seeds are usually grown in a substrate of crushed moss and leafy soil:
- Spread the soil in a container in a small layer, moisten it.
- Sowing of seeds is done in rows, without covering from above with earth.
- Keeping the temperature not lower than 25 degrees, they regularly spray with warm softened water to create a sufficient level of humidity.
- When the sprouts hatch and form the first leaf, they are transferred to the substrate from peat and chopped moss.
- After the formation of the third leaf, seedlings are moved to the soil of a more complex type - peat, moss, crushed roots of ferns.
The presence of four leaves will be a signal for the transfer of seedlings to a permanent place of residence, in separate pots. These kids will bloom only after a few years. The seed method is laborious and long, but allows you to create many new plants in one period.
Attention! It is very difficult to maintain the right temperature, lighting and a sterile culture medium. This is a whole science and only professionals can grow orchids from seeds.This is mainly done in the laboratory. It also describes the general principle of seed breeding.


Layering
This breeding is done like this:
- Aerial processes from thickened shoots are separated.
- Move from the mother to the greenhouse from a plastic bag or bottle. Having organized access to recharge in the form of moisture, they wait until kidneys are formed.
- After 30 days, new instances of orchids develop from the buds.
- Newborn plants are carefully cut and rooted in cups with soil. At this stage, they also use a greenhouse, without fail making airing.


Rooted
A risky way, you can destroy the plant. Great experience is needed.
- The upper tier of the orchid is separated with a sharp knife, where there is already a rosette of at least six leaves and up to ten, and the presence of the same number of aerial roots is also obvious.
- Slices are processed by dusting with charcoal.
- The separated part is planted in a small container with soil (dry substrate: bark + sphagnum). Constantly sprayed and nourished with a growth stimulant.
- When the roots grow, having gained volume, the orchid is planted in a permanent, larger pot.
You can learn more about orchid propagation by the roots of the house here.


Division
This is the main method for breeding sympodial orchids. A flower on which there are several false bulbs can be divided into parts, since each such thickening is an embryonic base for a new outlet. It is important to leave several pieces of false bulbs on the mother's orchid. Removing all pseudobulbs will lead to a decrease in growth and flowering activity.
Reference. Preparation of orchids for division is done a year before the procedure, which greatly simplifies the event.In places where it is supposed to divide the bush, you need to make light sections on the surface of the roots. As a result, a root-forming process is activated on daughter pseudobulbs, which contributes to the development of the kidney. And by the next spring season, the mother plant will gain enough strength to easily transfer division.
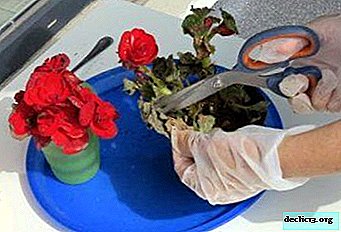
- The orchid is carefully removed from the pot with an earthen lump.
- Carefully free the roots from the soil, shaking it off the rhizomes.
- Separation is carried out into a couple of parts so that for each part individual roots and at least two to three tuberidia with a power reserve are stored. The places of tears are treated with charcoal powder.
- Separated parts can immediately move into individual pots.
- After planting do spraying and watering.
- They wait until the plant has settled. The emergence of new leaves or shoots means the full adaptation of the orchid as an independent plant.
- When in some of the parts in the process of separation a poor root system is obtained, then it is planted in a special substrate from chopped sphagnum.
- Then placed in a mini-hotbed, creating a warm, moist atmosphere, in which the roots form much faster.
As soon as the root system grows sufficiently, then the divide is planted in a permanent pot with ordinary soil.


Division of orchids with tuberidia for reproduction:
Kids
This method is not suitable for all types. Most often used reproduction by children for phalaenopsis and dendrobium. An orchid that grows well in this way in its native land is not prone to reproducing children at home, therefore it stimulates the plant in advance.
In this case hormone paste is widely used:
- Choose a kidney, one or more, carefully cut the scales from the top so that the green part is exposed, in the form of a dot.
- Lubricate the point with a cytokinin paste.
- Within a few weeks, babies form.
- They are separated and placed in nutrient soil.
Read more about orchid propagation by children in this article.


Cloning
Under laboratory conditions, cells located for division are extracted under a microscope. These are cells of the meristematic type. Having placed them in a favorable environment with food, they wait until they, through division, form clots. Then the clots are planted in different containers and after a while plants appear.
On a note. The method requires high accuracy of climate parameters and sterility.Allows you to quickly get immediately a huge number of plants of the same type.


Flower stalk
This is the shoot on which inflorescences form, and this the method is applicable only to orchids from the fast-growing category. Start the process after the orchid finishes flowering. What to do with the arrow, after the orchid has faded and how to propagate it?
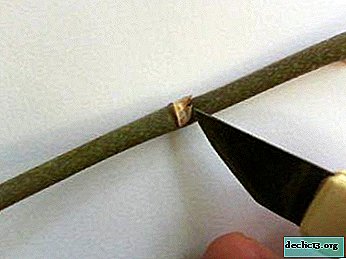
- The peduncle is separated with a sharp knife in the base area.
- Divided into fragments of three or four centimeters. Each potential fragment for reproduction must have one sleeping kidney. The best material for breeding would be a peduncle with axillary buds on at least two nodes.
- Disinfect the material with a fungicide.
- They put it in moist crushed sphagnum so that the kidneys are not covered by the substrate, making the greenhouse from the bag.
Germination requires a humid and warm climate, 25-28 degrees. A rosette and roots should form. After this, the plant is ready for independent life. Up to this point, it is necessary to observe the regime of the greenhouse. Do regular spraying, make sure that the roots do not rot.
You can read more about how to propagate an orchid through the peduncle of the house here.


How to grow a baby orchid on a cut flower stalk:
In a bottle
It is used to grow seedlings, which can be purchased in stores. There are firms that germinate seeds on an industrial scale. You can take a regular bottle or a laboratory glass flask. This allows you to create and maintain the specific environment necessary for seed germination.
The container must be hermetically sealed, and the seedling must sit tightly, not moving when turning or tipping the bulb so as not to bend or break. If the seedling hangs on a bottle, then bends of leaves are formed, which subsequently provoke diseases and rot.
Important! You need to carefully monitor the needs of a tender sprout, adjusting climatic conditions, lighting and humidification.A long, time-consuming, but tremulous and unusually joyful process.

How to grow an orchid in a bottle:
Cuttings
Power socket
- The apex with aerial roots is separated from a healthy developed orchid, and sections are sprinkled with coal powder.
- Treated with fungicides, garden var.
- Planted in a separate container and covered with a greenhouse-film.
- The same is done with the maternal orchid. A strong stalk does not require special care. If the handle is weak, then hormonal ointment is used to accelerate the development of the outlet.


Shoots
Fast-growing orchids propagate by cuttings by pulling the stem up from the growth point at the very top. Usually on such individuals there are no pseudobulbs, shoots are formed at a distance.
- Separate the lateral shoot with a sterilized knife.
- The cut is treated with charcoal powder. Root in the substrate.
More information about the propagation of orchids by cuttings of the house you will find here.


Problems
What can be encountered during reproduction:
- Thick and brittle roots break easily, which complicates the separation.
- There are difficulties in meeting specific requirements for temperature and humidity during breeding periods.
- Vulnerability to infections and decay.
- The just purchased orchid is pumped with stimulants and chemistry, for reproduction it needs to rest and gain strength throughout the year.
- Orchid seeds do not have a nutritious shell, which makes the process of removing plants from seeds particularly difficult.
- The most responsible and risky period is the adaptation of the baby orchid.
Take care after transplantation
- Light mode for at least 12 hours, optimally - 15.
- Maintain a humid climate.
- Direct sunlight is contraindicated.
- Watering is done with water, a little warmer than room temperature.
- It will be ideal to use rainwater or boiled water, since its softness is important.
- Excess watering will destroy the plant, but the plant will tolerate a little dryness.
- On a rainy and gloomy day, it is better not to water the orchid.
- Pots for planting take new ones or disinfect old ones.
Conclusion
With careful and careful care, a beautiful orchid will grow out of a small seedling, pleasing the eye with its grace and sophistication. The result obtained in the final of all works will undoubtedly energize and inspire both the florist himself and the rest of the household.
Watch the video: How to make a powerful Fume Extractor for less than $30 (May 2024).


-
How to treat constipation with aloe: formulations recipes
Aloe has been used since ancient times to treat various diseases. However, there are many nuances in herbal medicine. Therefore, it is worthwhile to figure out what diseases the plant cures for, how to use it, what properties and contraindications it has. Problems with a chair make a person’s life difficult and uncomfortable. If constipation is a frequent occurrence in life, you should find a remedy that will eliminate this delicate nuisance. ... -

-

-