Advantages and disadvantages of propagating Phalaenopsis orchids by cuttings at home
Can only professionals grow Phalaenopsis at home? No, with due diligence, this representative of an exotic family of tropical orchids will take root with the lover.
Having learned more about him from the reference literature for the florist, he will even be able to propagate it with cuttings. How to choose a suitable stalk? How to care for the plant after propagation? You will learn about all this in our article. We also recommend watching a useful video on this topic.
Features of the method
How to propagate the Phalaenopsis orchid at home? One of the most popular and common methods of vegetative propagation is cuttings. Phalaenopsis cuticle is a piece of peduncle. It is separated from an adult plant, which dropped buds 2-3 months ago. The best time for grafting is spring.
ATTENTION: If the orchid has not bloomed for more than one year, you can not use parts of it as a planting material. New plants are clones, i.e. genetic copies of the mother plant. They have the same genetic set as he does.Benefits:
- Simplicity of the procedure: the flower grower cuts the process with several buds and places it in the sphagnum moss.
- Getting a well-developed plant in a short period of time.
- A plant transplanted in this way will bloom in 1-2 years.
But this method of propagation of phalaenopsis has several disadvantages:
 Problems with root system buildup in a transplanted plant. Sometimes it helps to apply cytokinin paste to the roots or treat the cut sites with growth stimulants based on phytohormones (Epin, Kornevin, etc.).
- The need to observe all precautions when working with cuttings, i.e. processing of cut points and fungicide disinfection tools.
- After grafting, the plant is taken care of in a special way.
 Problems with root system buildup in a transplanted plant. Sometimes it helps to apply cytokinin paste to the roots or treat the cut sites with growth stimulants based on phytohormones (Epin, Kornevin, etc.).
Florists choose cuttings when they want to get a healthy and properly developed plant in a short period of time. You can learn about another popular method of propagating phalaenopsis at home - seeds - from a separate article.
Preliminary work
Process selection
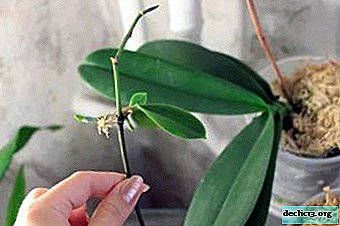
Cuttings are prepared from parts of a faded peduncle. They are divided into segments of 5-7 centimeters with one or more "sleeping" kidneys.
Cutting and cutting
Before cutting the cuttings, the tool is treated with an alcohol solution. This is done so that during the procedure not to bring the infection into the wound. Slicing sites are also disinfected using powdered activated carbon.
TIP: To cut a piece from the peduncle, pick up a pruner or nail clippers. But it is preferable to cut the cuttings with a garden pruner, which was invented specifically for cutting shoots, not thick branches, etc.The choice of materials and inventory
Experienced flower growers cut the cuttings after they prepare the pot and substrate. Do not use for propagation by cuttings for adult orchids. It is better to take sphagnum moss or sand.
More often they use sphagnum moss, as it has unique properties. Its other name is "white moss." It is harvested in dry marshes. The color of the moss varies (rust brown, pink, red, purplish red, light green, etc.). Cut material is placed on sand or moss-sphagnum, but do not bury them.
Step-by-step instructions for cutting
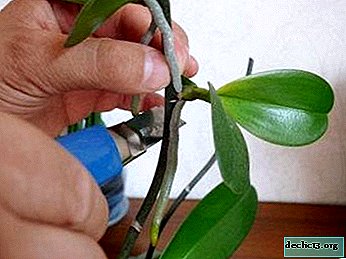 Cut the peduncle close to the base. The cut site, both on it and on the mother plant, is treated with a weak solution of potassium permanganate.
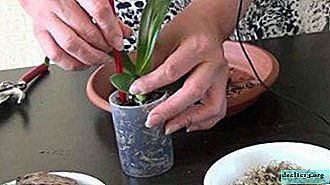
- Cut into pieces cuttings. To do this, use a razor blade or sharpened scalpel. The length of the parts is 5-7 cm. Slices are made at a slight angle, and there should be a “sleeping” point on each resulting cuttings.
- Take shallow wide containers and fill them with finely chopped sphagnum moss. Sometimes sand is used instead of moss. Before laying out the parts of the peduncle on this substrate, spray it with a solution of the Augustine biostimulator. They are laid on it horizontally, without deepening or sprinkling on top of anything.
- Cover the cuttings with plastic wrap or glass. The container with them is placed on the windowsill. The air temperature in the room should be +25 degrees Celsius. The optimum humidity is 70 percent or more. Landings are aired every day. As the substrate dries, it is sprayed with it, but not with water, but with a solution of the root stimulant.
- As soon as 3-5 centimeter roots and a pair of leaves appear, the young plant is transplanted into a substrate for adult orchids. When transplanted, all dead tissue is separated from the "offspring".
 Cut the peduncle close to the base. The cut site, both on it and on the mother plant, is treated with a weak solution of potassium permanganate.
Watch the video about Phalaenopsis cuttings:
Transfer
After the cuttings give roots and grow a couple of leaves, transplant them into a pot with a substrate for adult orchids. It should contain medium and small pieces of bark. At the very bottom of the pot, pebbles or fragments of pottery are placed. Then they put medium pieces of bark, and at the very top - small ones. The bark passes fluid quickly. Before laying the substrate, soak it in water for two days.
Further care
IMPORTANT: A young plant after transplantation needs special care. At the stage of root formation, you will need a mini-greenhouse.Florists do it yourself. To do this, they take a container. Sand or sphagnum moss is poured into it. Then put the cuttings in it, and cover with plastic wrap or glass on top. It's so simple to make a mini-greenhouse, which must be aired once a day so that the cuttings do not rot.
After the roots and first leaves appear, the plant is transplanted into a transparent pot. When preparing the substrate, all components are sterilized, treated with cold, steam or heat. You can withstand the bark in a pale pink solution of potassium permanganate or in water, in Fundazole or any other fungicide.
Conclusion
Even a novice grower will be able to propagate Phalaenopsis by cuttings. This method is the simplest of all that allow you to propagate an orchid at home. In a short period of time, they get a new plant with the same genetic traits as the mother.
Watch the video: Troubles with coconut husk media for orchids (December 2024).


-
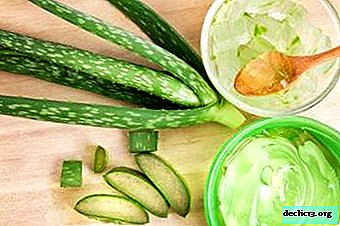
How to treat constipation with aloe: formulations recipes
Aloe has been used since ancient times to treat various diseases. However, there are many nuances in herbal medicine. Therefore, it is worthwhile to figure out what diseases the plant cures for, how to use it, what properties and contraindications it has. Problems with a chair make a person’s life difficult and uncomfortable. If constipation is a frequent occurrence in life, you should find a remedy that will eliminate this delicate nuisance. ... -

-
-